Drawing fluids is rather difficult in my opinion. The physics of the liquid itself will impact how a liquid may behave, but in the case of blood and water, their probabilities in terms of behaviour ( at least if the blood is pure ) are pretty similar when it comes to depictions that focus on outlining and a limited amount of colours.
When learning how to draw liquids, it’s important to have a firm grasp on the construction of the surface of which it is travelling. Otherwise, we won’t know how the stream will be bending and curving accordingly.
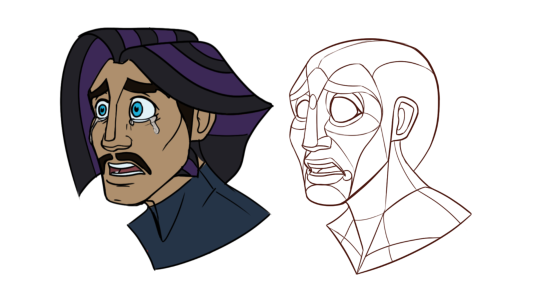
If you’ve seen me on the blog before, you might know of how I sometimes break my sketches down to wire grid maps ( More commonly known as construction sketches ). Sketches that explicitly explain the volumes of a character. I use this for shading particularly difficult light settings, but also as an aid if I need to draw liquids coming down a person’s figure. It may seem like a no-brainer that the cheek curves out and the chin curves in, but when you’re in the moment- and wanting to draw your liquid this kind of minute shapes easily slip your mind. As you get a firm grasp on how the face is constructed, you might not need to use the wireframe sketch every time. But if you’re having trouble with how your liquid should behave when trailing a part of the character- I cannot recommend this enough. You can look at a variety of artists’ wireframes and find a way to do yours so it fits with your needs.
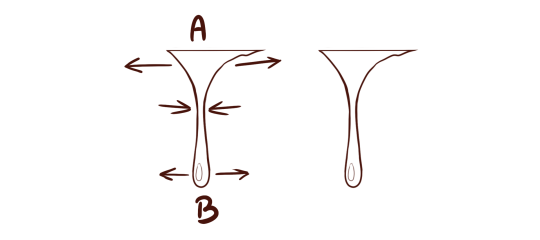
You can find plenty of resources that explain the exact behaviour of water in more specific terms. But generally it’s worth knowing that water- and similarly low-viscosity liquids will pool at the base of crevices and ledges, and then thin its volume out when rolling down a surface. If you’ve ever played around with slime, you might have noticed that the bulk- volume of the slime reduces in size when stretched, because the mass that the substance used to spread over a surface is spent when said substance is manipulated. That’s why the “base” of a tear nearly always starts out with the most mass at the base. Then thins until it reaches the portion of the mass that forms the drop.
High-viscosity liquids will be able to stretch much further before the main mass at the base will transfer to the drop, but for the sake of simplicity - I’ll propose that a teardrop typically disconnects from the tear duct at the latest when the drop itself reaches past the peak of the cheekbone. But for the sake of storytelling and clarity, artists often maintain the outline of the tear’s “travelling” by keeping the teardrop connected to the tear duct even if it would’ve technically have ‘let go’ of it.
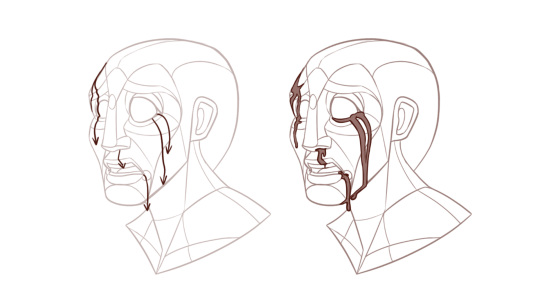
When you draw your fluid, it’s important to keep the volumes it’s travelling over in mind.
Remember that fluids will pool whenever it finds purchase in a ledge of a crevice, or when surface tension keeps them suspended to an edge ( for an example when dangling off the chin or jaw ). Typical places for low-viscosity fluids to pool include:Right above the upper lip, the cavity between the eye and the cheek. The corner of the eyes, the corner of the lips, and in the nook between your bottom lip and chin.
from The Redline Station https://ift.tt/2WT2pQ9
via IFTTT


No comments:
Post a Comment